

Suddenly you notice a new crack in your horse’s hoof! Wait, was that there yesterday? You pull out your cell phone, snap a quick picture, and send to your hoofcare provider or vet and wait for a reply.
I have been sent many hoof pictures over the years – from clients curious about something possibly brewing or from other local equine professionals looking for some advice. 90% of the time, I cannot answer their questions due to the poor quality of the photo. So here is a quick tutorial on how to take clear and accurate hoof pictures.
Taking Great Hoof Pictures
- Clean the foot! I can’t tell you how many pictures of dirty feet have been sent to me. It is impossible for your hoofcare provider or vet to see what’s going on beneath the dirt. Use your hoof pick, brush, and even a dry towel to completely clear the foot of dirt and debris – especially the sole.
- Make sure to focus your camera – if it is blurry, it’s useless.
- FIND GOOD LIGHTING! You can also lighten the pictures through editing later, but using good natural light is much easier.
- Take a full set of pictures – this includes sole view (foot propped up on your knee or held stable by one hand), side view (foot is on the ground, you’re facing the side of the foot), and front view (foot on the ground, you’re facing the horse’s chest). For the side view, I suggest putting your camera as close to the ground as possible, so you’re looking straight AT the foot and not down at it.
- Make sure your horse is bearing full weight on the foot you’re photographing (unless that is too painful for them in case of an injury).
- Label them immediately so you don’t forget which foot is which. I usually leave a clue in the picture, like their tail (clearly that’s a hind foot!) or with my hand or shoe in the picture (to tell if it’s the right or left foot).
- Date and save them in a file somewhere – you never know when you’ll want to look back at them in the future.
I take a full set of pictures at each initial appointment with new clients. I love tracking their progress, especially with horses who are going to make a lot of progress in a short amount of time.
Sole View Example
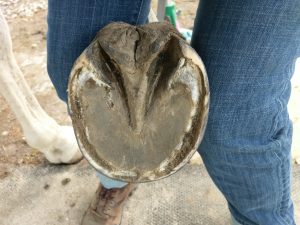
Sole view, right front.
Side View Example
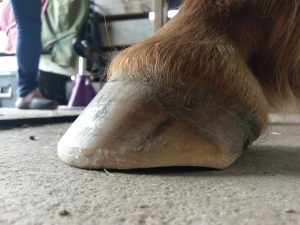
Side view, left hind. This is a good example of why #4 is important – this horse isn’t bearing his full weight, so it’s tilted slightly.
Front View Example
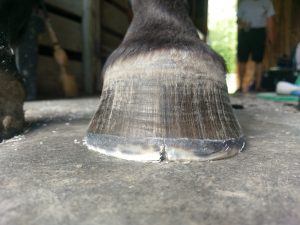
Front view, left hind. Looking straight on. This is the best angle to see flare happening, and it also works for tracking the progress of toe cracks.
No Comments